How to find Discord channels with Channel Finder
Learn how Autosender Channel Finder scans accessible Discord servers by channel-name keywords, verifies writable matches, and imports selected channel IDs.
Published on July 15, 2026
Building a Discord campaign is much easier when you do not have to copy every target channel ID manually. Autosender's Channel Finder scans the servers visible to a connected Discord account, matches channel names against your keywords, checks which matches the account can write in, and lets you import the selected IDs directly into the open campaign.
Channel Finder does not search every public Discord server. Its search area is the set of servers the selected account has already joined, and its results depend on that account's channel access and permissions.
This guide explains what Channel Finder searches, how weekly scans work, how to choose useful keywords, and how to move verified results into a campaign without creating duplicate targets.
Before you begin: Only scan and target servers where the connected account is authorized to participate. Channel Finder helps locate accessible destinations; it does not grant access, bypass channel permissions, or make an unsuitable campaign acceptable.
Channel Finder in one sentence
Channel Finder looks for case-insensitive keyword matches inside channel names, verifies that the selected account can write in those channels, and returns the server, channel, matched keyword, and channel ID.
It searches channel names such as:
#announcements#partner-listings#community-giveaways
It does not search message history, post content, member profiles, or servers the account has not joined.
Plan limits and weekly resets
At the time of writing, the normal weekly scan limits are:
- Free: Channel Finder unavailable
- Plus: 5 scans per week
- Pro: 10 scans per week
- Ultra: 25 scans per week
The dialog shows the remaining count and exact reset time for your locale. The weekly window resets on Monday in UTC, which may appear as a different local hour.
A scan is counted when the job is created. Canceling or deleting that job does not return the weekly slot, so review the account and keywords before clicking the start button.
1. Open a new or existing campaign
Open the Autosender Dashboard and either create a campaign or edit an existing one. Complete the Discord Account field first because Channel Finder uses that account's current server memberships and permissions.
Scroll to Target Channels. On a plan with Channel Finder access, the button appears beside the current target counter.
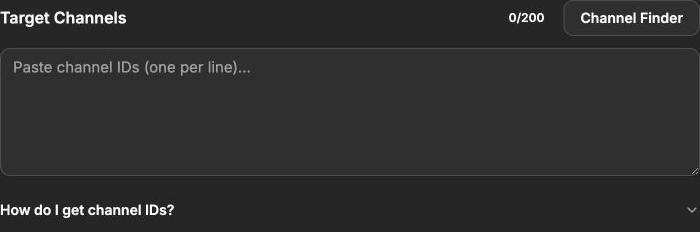
Channel Finder is part of the campaign editor because its selected results are imported into that campaign's Target Channels field.
If you change the campaign's Discord account, run a new scan for the new account instead of assuming it can access the same destinations.
2. Open Channel Finder and check the weekly allowance
Click Channel Finder. The usage card at the top shows:
- How many scans remain this week
- The plan's weekly scan limit
- The date and time when the count resets
The Current targets value comes from the open campaign. Keep it in mind when choosing results because imported IDs still count toward the campaign's normal channel limit.
Channel Finder history belongs to your Autosender account rather than one saved campaign. You can reopen a recent scan from another campaign editor and import a different selection into the campaign currently open.
3. Add channel-name keywords
Stay on Start Scan and add one keyword per line. You can enter up to 25 keywords in one scan.
Use keywords that are likely to appear in the channel name:
announcementspartnershipsgiveawaysmarketplaceself-promo
Keywords are trimmed, converted to lowercase, and deduplicated for the scan. Each keyword should be between 3 and 64 characters. Enter the word without a leading #; Channel Finder compares the text against the normalized channel name.
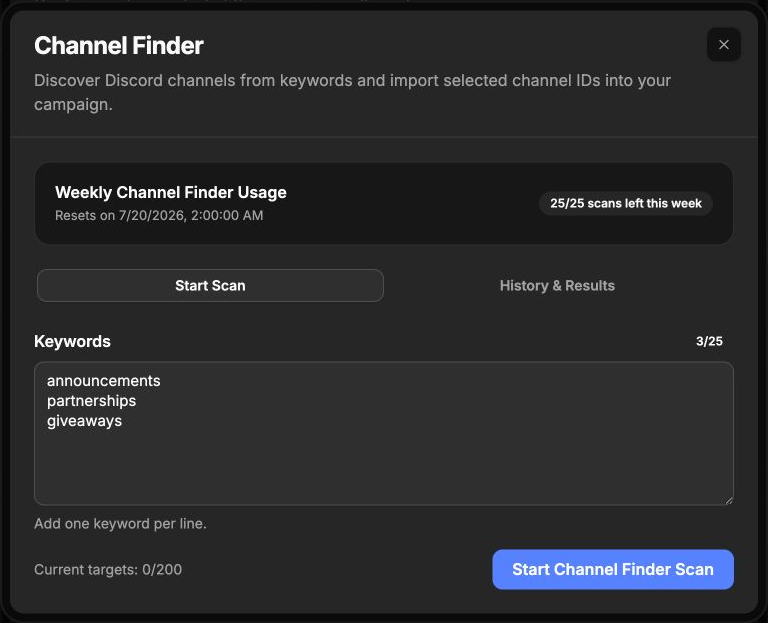
This Ultra example has three keywords, no existing targets, and the full weekly allowance before the scan is started.
Choose specific keywords
Matching is a case-insensitive substring check. The keyword announcement can match #announcements, #staff-announcements, and #announcement-archive.
That flexibility is useful, but broad terms can produce more results than you need. Prefer keywords tied to the intended campaign and review every match before importing it.
The first keyword that matches a channel name is saved in the Matched column. If two keywords could match the same channel, you still receive one channel result rather than duplicate rows for every keyword.
4. Start the scan once
Review the selected Discord account, keyword count, and weekly allowance. Click Start Channel Finder Scan once.
Autosender creates a scan job, reduces the weekly remaining count, and moves to History & Results. A new job can begin in Queued status while it waits for the scan worker.
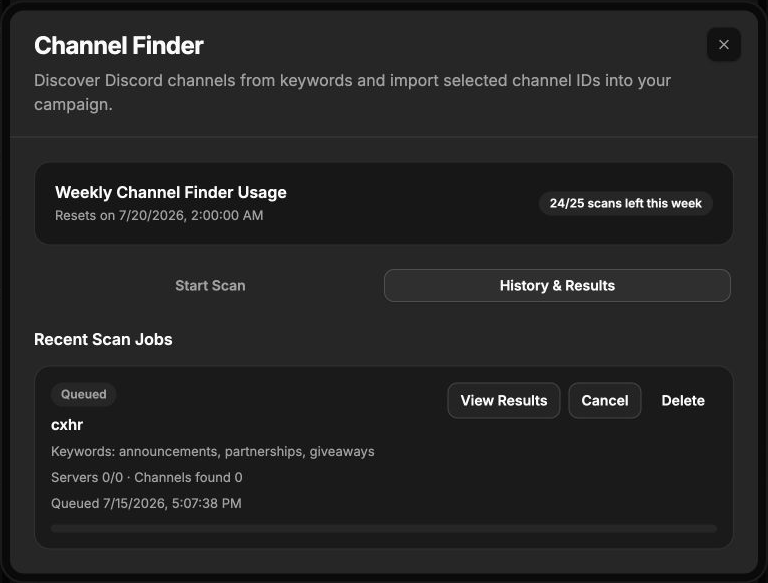
The weekly counter changed from 25/25 to 24/25 as soon as this scan was queued.
Do not submit the same scan repeatedly because a job stays queued longer than expected. Keep the dialog open or return to its history later; the job remains available independently of the campaign form.
How the scan works
When processing begins, Channel Finder:
- Loads the servers visible to the selected account.
- Loads supported text, announcement, forum-thread, and thread destinations from each server.
- Compares each channel name with the normalized keyword list.
- Safely probes each matching destination to confirm that the account can write there.
- Excludes unknown, inaccessible, or permission-blocked channels.
- Saves the verified matches and updates the server and result counters.
The writeability check does not publish a visible campaign message. It validates the Discord response before adding the channel to the result list.
Large scans have safety limits on the number of channel probes, and Discord errors or account authentication problems can stop a job early. The job card shows the error when that happens.
5. Watch processing results
While a job is Processing, its card updates with:
- Servers checked compared with total servers
- Channels found so far
- A progress bar
- Cancel and View Results controls
Results can appear before the scan is finished. You may inspect them, but wait for Completed before making the final selection so later server checks are not omitted.
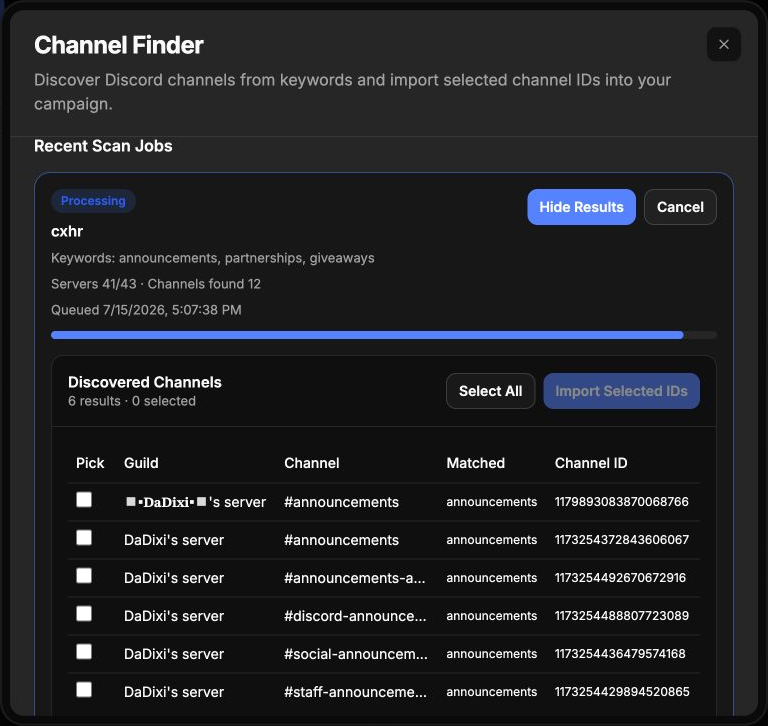
This live scan was still checking servers while verified announcement-channel results were already available.
6. Confirm the completed result count
When the status changes to Completed, compare Channels found with the result count inside Discovered Channels. If you had the results open while the final servers finished, hide and reopen them once to load the complete result list.
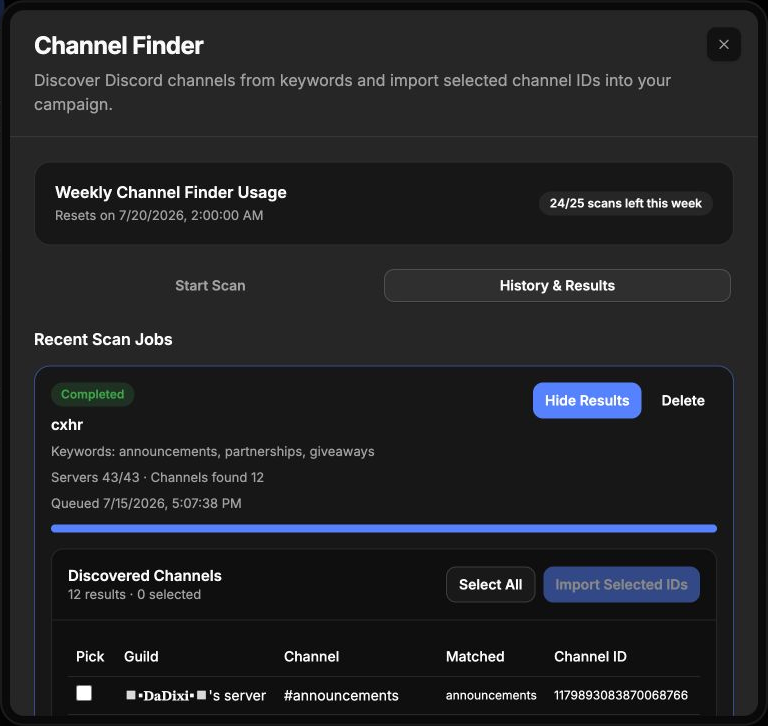
The completed job checked all 43 visible servers and returned 12 writable channel matches.
7. Review and select discovered channels
Every result row includes:
- Guild: the Discord server name
- Channel: the matching channel name
- Matched: the keyword responsible for the match
- Channel ID: the numeric ID that will be imported
Select rows individually when only a few channels fit the campaign. Use Select All only after reviewing the complete table.
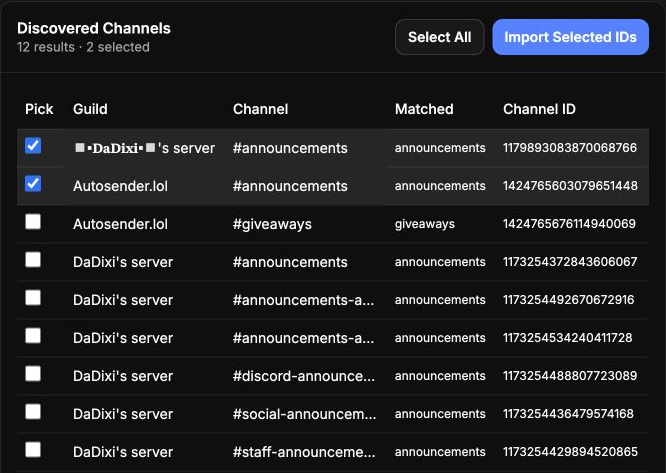
Two verified announcement channels are selected. Other matches remain available but are not imported.
A matching name is not permission to post arbitrary content. Check the server, channel topic, pinned rules, and posting frequency before using any result in a campaign.
8. Import selected channel IDs
Click Import Selected IDs. Channel Finder closes and merges the selected IDs into the campaign's Target Channels field.
The import behavior is intentionally safe for an existing campaign:
- Existing target IDs remain in the field.
- Selected IDs are appended.
- Exact duplicate IDs are removed.
- The target counter updates immediately.
- The campaign is not saved or started automatically.
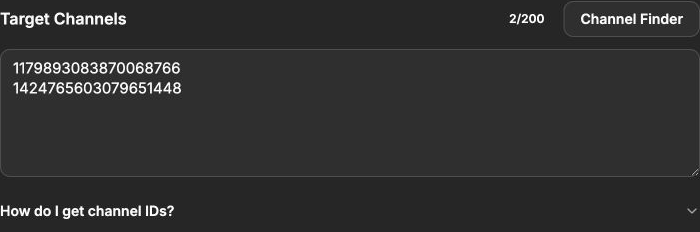
The two selected results were merged into Target Channels. The campaign still needs to be reviewed and created.
After importing, finish the message, schedule, advanced settings, and other required fields. Click Create Campaign or save the edit only after confirming that the channel counter remains within the plan limit.
Scan statuses and controls
Channel Finder uses several job states:
- Queued: waiting for the worker; you can view partial results, cancel, or delete the queued job.
- Processing: actively checking servers and channels; you can view results or cancel, but not delete it mid-process.
- Completed: the final result set is ready; you can view, select, import, or delete the history job.
- Failed: the job stopped with an error; fix the displayed cause and use Retry.
- Cancelled: processing was stopped; use Resume to queue the same job again or delete it.
Retry and Resume reuse the existing job. Deleting archives the job from normal history but does not restore the weekly scan that was consumed when it was created.
Better keyword strategies
Finding announcement destinations
Try announcements, then review variants such as staff-only or archive channels carefully. A name match does not tell you the intended audience.
Finding partnership channels
Use focused terms such as partnership, partners, or affiliates. Run one scan with several related terms instead of spending separate weekly scans on each spelling.
Finding marketplace or listing channels
Terms like marketplace, listings, or a category-specific word can help. Confirm that automated or repeated listings are permitted before adding the result.
Avoiding noisy results
Do not start with extremely short or generic terms. ad, for example, is only three characters and can appear inside unrelated names. A longer term normally produces a more useful result table.
Troubleshooting
The Channel Finder button is missing
Free plans have no weekly Channel Finder allowance. The button appears when the plan's weekly scan limit is greater than zero.
Start Channel Finder Scan is disabled
Select a valid Discord account in the campaign editor, add at least one keyword, stay within 25 lines, and confirm that the weekly remaining count is above zero.
A known channel is not in the results
Check all four conditions:
- The selected account is already a member of the server.
- The account can see the channel.
- The channel name contains one of the keywords.
- The account has permission to write in that destination.
Channel Finder deliberately excludes a name match when the account cannot use it as a campaign target.
The result count is still increasing
The scan is still processing. Wait until the card says Completed, then reopen View Results before selecting channels.
Import Selected IDs is disabled
Select at least one result row. The button becomes available as soon as the selection count is greater than zero.
Imported channels pushed the campaign over its limit
Channel Finder does not raise the campaign's channel allowance. Remove unnecessary IDs until the Target Channels counter is within the displayed plan limit.
The scan failed
Read the error on the job card. Reconnect an invalid account or wait out a temporary Discord problem, then use Retry. Do not create several replacement scans without addressing the cause.
Final checklist
Before saving a campaign built with Channel Finder, confirm:
- The scan used the same account selected for the campaign.
- Every keyword was specific enough to return relevant channel names.
- The job reached Completed before the final selection.
- You reviewed the server and channel name for every selected row.
- The account is allowed to post the campaign content in those channels.
- Imported IDs were deduplicated and remain within the target limit.
- The campaign schedule follows every destination's rules.
Channel Finder removes the copying step, not the judgment step. Use it to build an accurate shortlist, verify each destination, and then save a campaign that targets only appropriate channels.