How to automatically send commands on Discord
Learn how to capture a Discord slash-command interaction, import it into Autosender, verify its options, choose target channels, and schedule automatic command runs.
Publicerad 15 juli 2026
Discord slash commands can trigger reminders, moderation tools, utility bots, and other server workflows. When the same permitted command needs to run on a predictable schedule, an Autosender Command campaign can reproduce that command in selected channels without turning it into a plain text message.
This guide shows the complete setup: capture a working command request in Discord, import its interaction payload, verify the command metadata and options, choose a schedule and target channels, and test the campaign safely.
Before you begin: Automate only commands you are authorized to use. The connected account still needs access to each channel, the application must be available there, and the command must follow Discord's rules plus the rules of every server and bot involved.
What an automatic command campaign does
A Command campaign sends a Discord application command on a recurring schedule. It is different from typing /command into a normal message box: Discord commands carry application, command, version, option, and channel information in a structured interaction.
Autosender gets that structure from a command you run successfully in Discord. Its importer reads the interaction payload and fills in the fields the campaign needs. You then select the interval and channels in which the command should run.
Command delivery is available on paid Autosender plans. The campaign editor displays the limits and capabilities included with the current plan.
What you need
Prepare the following before opening the editor:
- A Discord account connected to Autosender
- A paid Autosender plan
- Permission to run the command you want to automate
- Discord open in a web browser
- One successful manual run with the exact options you want
- One or more target channel IDs
- A schedule that the server and bot allow
Use a test channel when possible. It gives you a safe place to verify the imported command before adding production destinations.
1. Create a campaign and select Command
Open the Autosender Dashboard, find Autosender Campaigns, and click Create Campaign. Enter a clear internal name, select the connected account, and choose Command under Delivery Mode.
The form now shows command-specific fields such as Application ID, Command ID, Command Version, Command Name, and Command Options. Although those fields can be edited manually, importing a known-good interaction is faster and less error-prone.
If the Command tab is disabled, check the plan badge shown in the editor. Command delivery cannot be selected on the free plan.
2. Capture a working command payload in Discord
The campaign editor includes a How do I get payload? walkthrough. The process uses the browser's developer tools:
- Open Discord in the browser and go to a channel where the command works.
- Open Developer Tools with F12 or Inspect.
- Select the Network tab.
- Run the slash command once with the desired options.
- Find and select the network request named interactions.
- Copy its request payload JSON, or copy the request as cURL.
- Return to Autosender and open Import Payload.
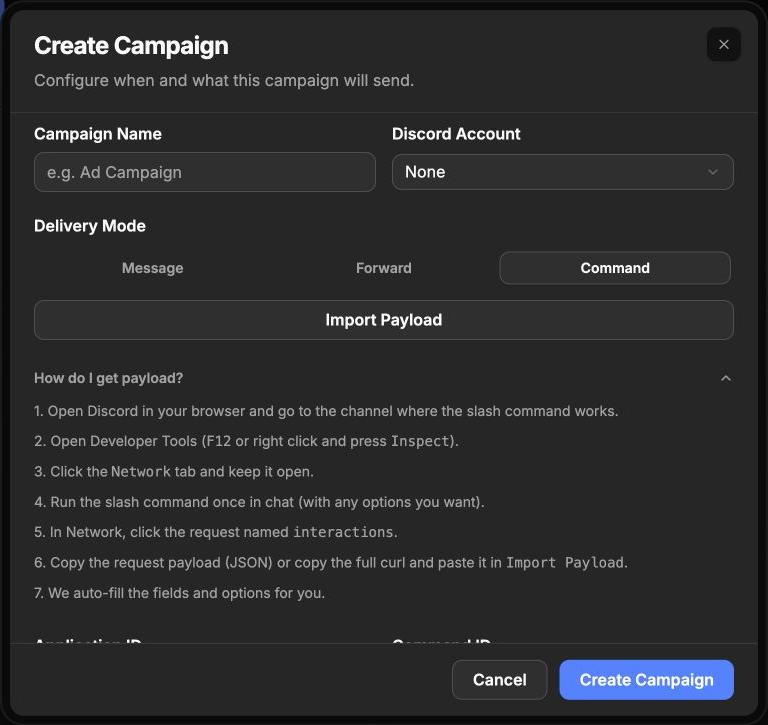
Run the command exactly as it should be automated. The interaction request records the selected command and option values.
Treat copied network requests as sensitive working data. Do not publish a real payload or cURL command, paste it into chat, or leave it in a shared document. If you copy the full cURL request, use it only in the trusted Autosender importer and clear it from the clipboard afterward.
3. Import the interaction payload
Click Import Payload, paste the copied JSON or cURL into the dialog, and choose Import. Autosender parses the interaction and fills the command fields automatically.
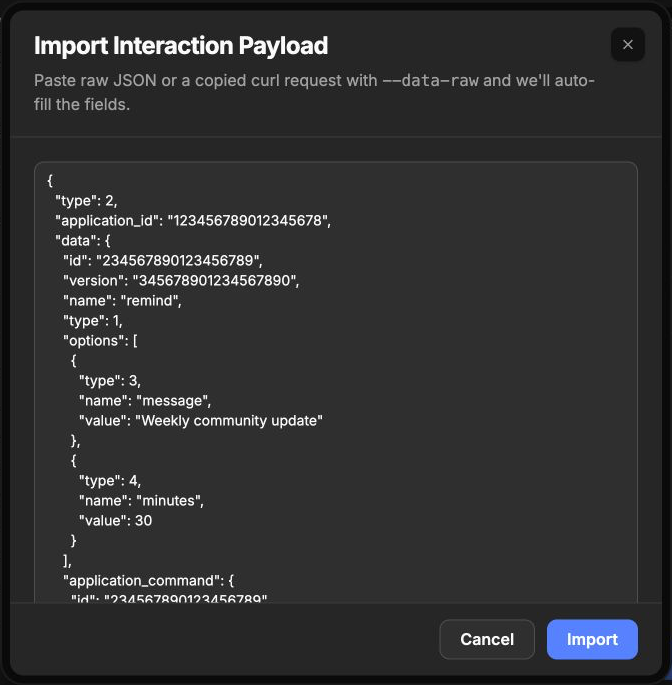
The payload and IDs in these screenshots are fictional examples. Always capture your own working interaction from Discord.
Using the importer is important because two commands with a similar visible name can belong to different applications or versions. The captured interaction tells Autosender which command Discord actually accepted.
4. Verify the imported command details
After the import closes, review all four primary fields:
- Application ID identifies the Discord application or bot that owns the command.
- Command ID identifies the specific application command.
- Command Version identifies the version captured in the interaction.
- Command Name is the slash command name without the leading slash.
Application and command IDs are Discord snowflakes containing 17 to 20 digits. Do not replace them with a bot user ID, server ID, or channel ID. The fields serve different purposes even though all of them look like long numbers.
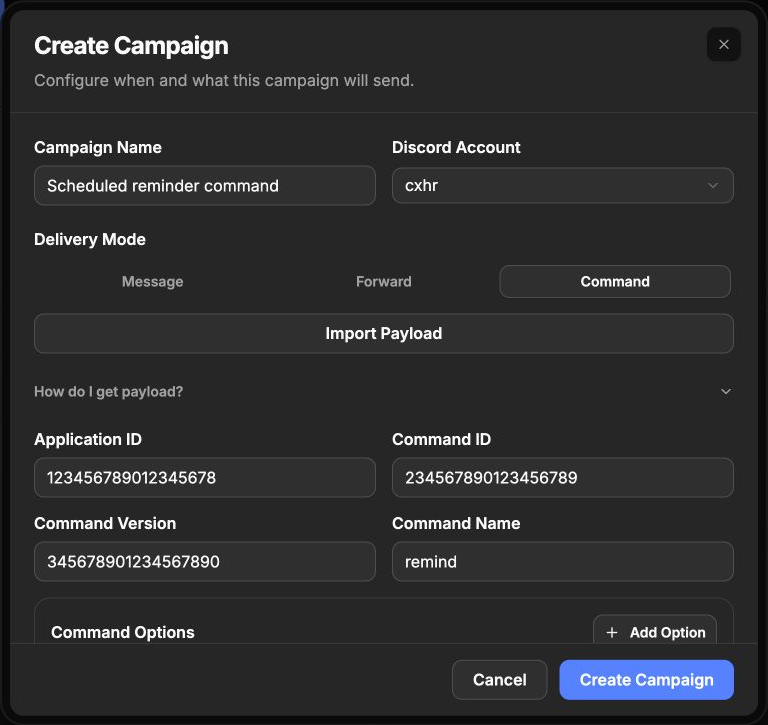
A successful import populates the command metadata. Re-capture the interaction if these values do not match the command you ran.
5. Review command options and their types
Options are the values supplied after a slash command. For example, a reminder command might contain a text option named message and an integer option named minutes.
Autosender supports Discord's application-command option types:
- 1 — Subcommand
- 2 — Subcommand group
- 3 — String
- 4 — Integer
- 5 — Boolean
- 6 — User
- 7 — Channel
- 8 — Role
- 9 — Mentionable
- 10 — Number
- 11 — Attachment
The importer normally builds this list for you. Check each option's name, type, and value against the command you ran. Subcommands and subcommand groups can contain nested options, so importing is especially useful for commands with several levels.
You can use Add Option for a manual correction, but do not guess an option type. A value that looks like a number may still be defined by the bot as a String, while a User or Channel option expects a Discord ID with a specific meaning.
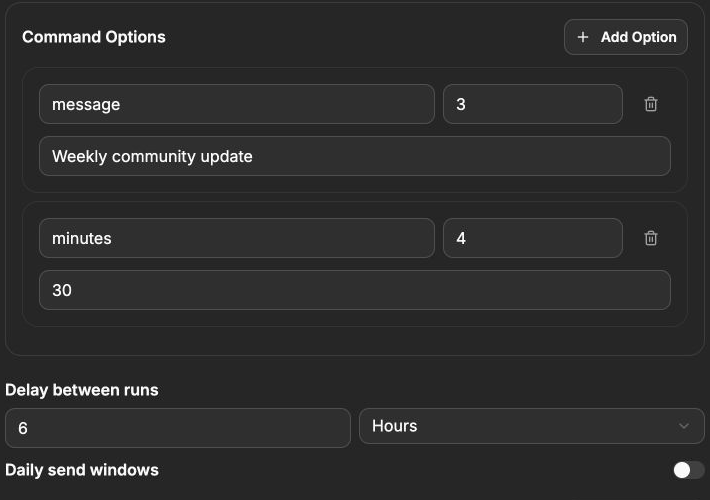
In this fictional example, message is a String and minutes is an Integer. The campaign is set to run every six hours.
6. Choose the run interval and target channels
Under Delay between runs, enter a number and choose Seconds, Minutes, Hours, or Days. This controls the time between campaign runs.
Turn on Daily send windows if commands should run only during selected hours. When it is enabled, use the timezone shown by the editor and make sure the window is long enough for the intended run frequency.
In Target Channels, paste one Discord channel ID per line. The counter shows the number entered and the maximum allowed by the current plan. Every destination must meet all of these conditions:
- The connected account can view the channel.
- The account is allowed to use application commands there.
- The bot or application that owns the command is available in that server and channel.
- The command itself is enabled for that account and destination.
Use Channel Finder when available, or expand How do I get channel IDs? for the built-in ID instructions.
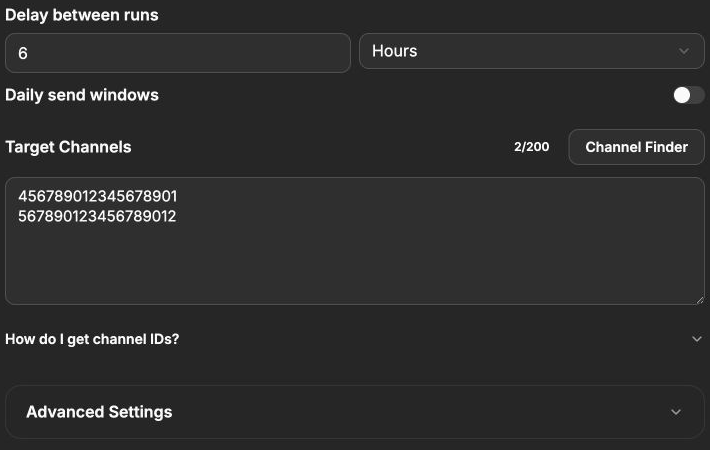
Add only channels where this exact command worked manually. The IDs above are examples, not real Discord destinations.
7. Review, create, and start the campaign
Before clicking Create Campaign, check the full configuration:
- The intended Discord account is selected.
- Command is the active delivery mode.
- The command metadata came from the correct interaction.
- Every option has the expected name, type, and value.
- The interval and optional daily windows are reasonable.
- Every target channel ID appears on its own line.
- The command is permitted in every destination.
Create the campaign, return to the dashboard, and select Start Campaign on its card. Watch the campaign's Messages Sent, Failed, and Next Send In values during the first run. Stop it immediately if a command executes with the wrong options or in the wrong channel.
Test an automatic command safely
Start with the smallest possible test:
- Use one target channel you control.
- Choose an interval long enough to inspect a single run.
- Confirm that the expected application responds.
- Verify every option, especially users, roles, channels, durations, and destructive actions.
- Stop the campaign after the test.
- Add the remaining approved channels only after the result is correct.
Do not use a live moderation, payment, role-management, or destructive command as the first test. When a bot offers a harmless status or reminder command, validate the workflow with that first.
Troubleshooting
Command cannot be selected
Command delivery is available on paid plans. If its tab is disabled, check the current subscription and the badge in the campaign editor.
Import Payload reports invalid JSON or cURL
Copy the interaction again from the browser's Network panel. Paste either the raw request payload JSON or the complete copied cURL request without adding Markdown fences, commentary, or extra characters.
Required command fields remain empty
Make sure you selected the request named interactions from the same moment the slash command was sent. Loading the command menu can create other network requests that do not contain a submitted interaction.
The IDs are rejected
Application ID and Command ID must each be a 17-to-20-digit Discord snowflake. Import the payload again instead of substituting an ID from another Discord menu.
The command used to work but now fails
The application owner may have changed the command definition or version. Run the command manually again, capture a fresh interaction, and re-import it so the campaign uses current metadata and options.
The command works in one channel but not another
Check the account's channel access, application-command permission, bot availability, server-specific command settings, and option references. A role, user, or channel selected in one server may not exist in another.
An option is interpreted incorrectly
Compare the option type with the captured interaction. Do not change an Integer to a String or replace a User, Channel, or Role value with its visible name. Re-importing a successful manual run is the safest correction.
Commands run too often
Increase Delay between runs, review any daily send window, and follow the rate and automation rules set by Discord, the server, and the application owner.
Final checklist
Before relying on the campaign, confirm all nine items:
- The account is connected and authorized to run the command.
- Command is selected as the delivery mode.
- The payload came from a successful browser interaction.
- Application ID, Command ID, version, and name match that interaction.
- Every option has the correct type and value.
- The interval complies with all relevant rules.
- Every target channel supports the application and command.
- A single-channel test completed with the expected result.
- The first live runs are being monitored for failures.
Once those checks pass, expand the approved destination list gradually and capture a fresh payload whenever the command's definition changes.