How to automatically forward messages on Discord
Learn how to create a Discord forwarding campaign in Autosender, add one or more source messages, choose target channels, schedule each run, and configure source-specific deletion.
Veröffentlicht am 15. Juli 2026
Automatically forwarding a Discord message is useful when the same announcement, listing, or reference post needs to reach several channels. Instead of copying the text into every destination, Autosender can use an existing Discord message as the source and forward it to the target channels on a recurring schedule.
This guide covers the complete Forward campaign setup: finding the source IDs, selecting Forward delivery, adding more than one source, setting the interval and destinations, and optionally deleting forwarded messages after a chosen amount of time.
Before you begin: Forward only messages you are allowed to share, and send them only to channels where the connected account has permission to post. Automation does not override server rules or Discord permissions.
What a Forward campaign does
A Forward campaign has two sides:
- A forward source identifies the existing message Autosender should use.
- Target Channels identify the destinations that should receive it.
Each source needs both its original Message ID and Channel ID. The campaign also needs a connected Discord account and a repeat interval. Once the campaign is saved and started, Autosender runs that forwarding setup on the schedule you selected.
Message forwarding is available on paid Autosender plans. The editor shows the exact source and target-channel limits for your current plan.
What you need
Have these ready before opening the campaign editor:
- A Discord account connected to Autosender
- A paid Autosender plan
- The message ID and channel ID for at least one source message
- One or more target channel IDs
- Permission for the connected account to view the source and post in every destination
- A repeat interval that follows the rules of all target servers
If Discord does not show Copy ID in its menus, open User Settings, go to Advanced, and enable Developer Mode first.
1. Copy the source message and channel IDs
Open Discord and go to the message you want to forward.
- Right-click the source message and choose Copy Message ID.
- Right-click the source channel and choose Copy Channel ID.
- Keep the two values together so you do not accidentally pair a message with the wrong channel.
Autosender requires the source message to be the latest message in its channel when you add it. Complete the setup while it is still the newest message, or use a quiet source channel where another post will not immediately move ahead of it.
Discord IDs are long numbers. Paste only the ID itself, not a message link, channel mention, extra spaces, or explanatory text.
2. Create a Forward campaign
Open the Autosender Dashboard, find Autosender Campaigns, and click Create Campaign. Configure the first part of the form:
- Give the campaign a descriptive internal name.
- Select the Discord account that should perform the forwarding.
- Under Delivery Mode, choose Forward.
- Paste the source Message ID into the left field.
- Paste the matching source Channel ID into the right field.
The Forward option is disabled on the free plan. If you cannot select it, check the plan badge in the editor before troubleshooting the source IDs.
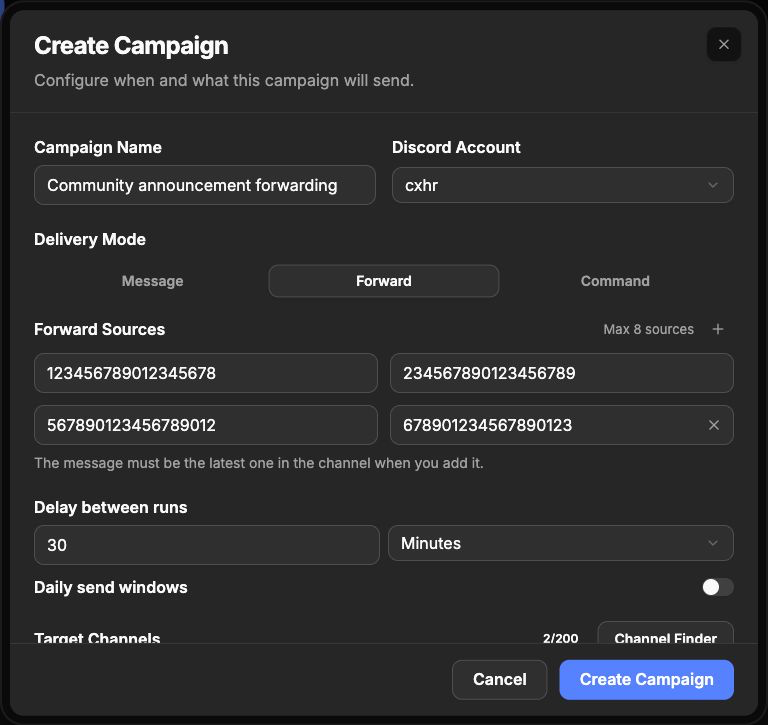
Each row is one source pair: the message ID is on the left and its original channel ID is on the right. The IDs shown are examples.
3. Add more forward sources when needed
One source is enough for a basic forwarding campaign. If the campaign should use additional source messages, click the plus button beside the source limit and add another message-and-channel pair.
Keep these rules in mind:
- Every source row must contain both IDs.
- The message ID must belong to the channel ID in the same row.
- Duplicate source pairs are not useful and are removed during normalization.
- The limit beside Forward Sources is the maximum for the current plan.
- Use the X on an added row to remove it before saving.
When you use several sources, test the campaign with a small set of destinations first. That makes it easy to confirm that every source resolves correctly before the campaign reaches more channels.
4. Set the forwarding interval
Under Delay between runs, enter a number and choose Seconds, Minutes, Hours, or Days. This is the interval between campaign runs.
Choose the delay based on the strictest target-channel rule. A message that is acceptable every few hours in one server may be considered spam if it is forwarded every few minutes in another.
Enable Daily send windows when forwarding should happen only during selected hours. The editor displays the timezone used for those windows after you turn the option on. Leave it off when the campaign may run throughout the day.
5. Add the target channels
Paste the destination channel IDs into Target Channels, with one ID on each line. The counter shows how many destinations are currently entered and the maximum allowed by the plan.
Before saving, confirm that the connected Discord account can:
- Access the source channel and source message.
- View every target channel.
- Send messages in every target channel.
Use Channel Finder when it is available on your plan and you need help collecting destination channels. You can also expand How do I get channel IDs? for the walkthrough built into the editor.
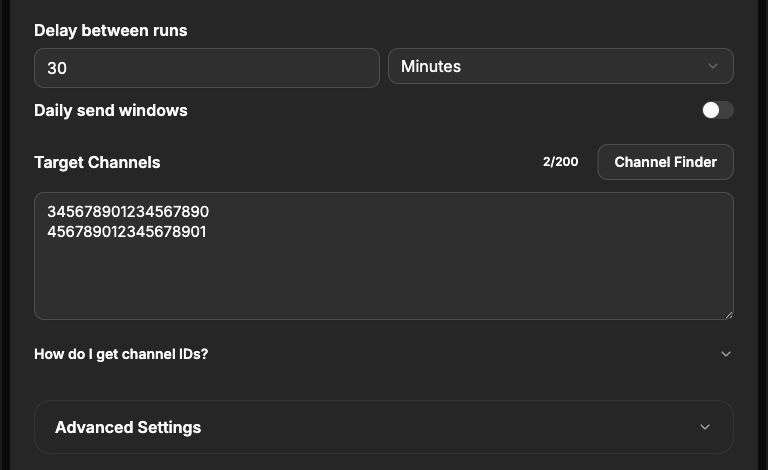
This example runs every 30 minutes and contains two example destinations. Replace them with real channel IDs where the account is allowed to post.
6. Optional: delete forwarded messages automatically
Pro and Ultra plans can give each forward source its own deletion timer. This is useful for temporary listings, rotating notices, or channels where an older forwarded post should disappear before the next one remains visible.
To configure it:
- Expand Advanced Settings.
- Turn on Auto-Delete Sent Messages.
- Enable deletion for the source that needs it.
- Enter the delay and select its unit.
- Repeat for any other source that should have a timer.
The timer belongs to the source row, so Source 1 and Source 2 can use different behavior. Leave a source switch off when messages forwarded from that source should remain in the target channels.
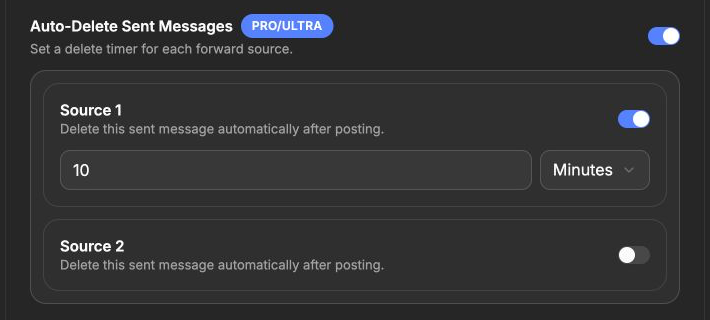
Source 1 is deleted ten minutes after posting, while messages forwarded from Source 2 remain in place.
7. Review, save, and start the campaign
Before clicking Create Campaign, review the complete setup:
- The intended Discord account is selected.
- Forward is the active delivery mode.
- Every source contains a matching message ID and channel ID.
- Each source message is still the latest message in its channel while it is being added.
- The interval and optional daily window are correct.
- Every target channel ID is on its own line.
- Source-specific deletion is configured only where you want it.
Click Create Campaign, return to the dashboard, and click Start Campaign on the new card. Watch Messages Sent, Failed, and Next Send In during the first runs. Stop the campaign immediately if a source or destination is wrong.
Test forwarding safely
Use a controlled first run before forwarding to a large destination list:
- Start with one source and one target channel you can inspect.
- Use a reasonable interval rather than the shortest possible delay.
- Confirm the correct message appears in the intended channel.
- If auto-delete is enabled, wait for the complete timer and verify the forwarded message disappears.
- Add the remaining sources and destinations only after that test passes.
This small test catches mixed-up source pairs, missing permissions, and incorrect deletion units without affecting every destination.
Troubleshooting
Forward cannot be selected
Forward delivery is available on paid plans. If the tab is disabled, check the current plan and the Paid plans only badge in the editor.
Autosender rejects a source ID
Both values must be Discord IDs containing 17 to 20 digits. Copy the message ID and channel ID again with Developer Mode enabled. Do not paste the full message URL.
Autosender says the source message is not the latest
Another message has been posted after the source. Use the newest message in that channel or move the source content to a quiet channel and copy its new IDs before creating the campaign.
The campaign starts but nothing is forwarded
Confirm that the selected account is still connected, can access the source channel, and can send messages in the target channel. Then verify that each message ID belongs to the channel ID beside it.
Some target channels fail
Review the failed count and any invalidated-channel notice on the campaign card. Recheck the failed channel IDs and the account's permissions in those specific destinations.
A forwarded message is deleted too early or never deleted
Open Advanced Settings and check the timer for that exact source. Confirm the source switch, number, and unit. The master Auto-Delete switch alone does not enable a timer for every source.
Final checklist
Before relying on the forwarding campaign, confirm all eight items:
- The connected account can read the source and post in every destination.
- Forward is selected as the delivery mode.
- Every message ID is paired with its original channel ID.
- Source messages satisfy the latest-message requirement when added.
- The repeat interval follows all target-channel rules.
- Destination IDs are correct and within the displayed plan limit.
- Auto-delete timers are enabled only for the intended sources.
- A controlled first run completed successfully.
Once those checks pass, expand the destination list gradually and keep an eye on the campaign's sent and failed counts.